

Creating & Handling DropDown
A dropdown in Flutter is a widget that presents a list of options to the user in a menu that can be expanded or collapsed. It is commonly used when the user needs to select one option from a list of predefined choices.
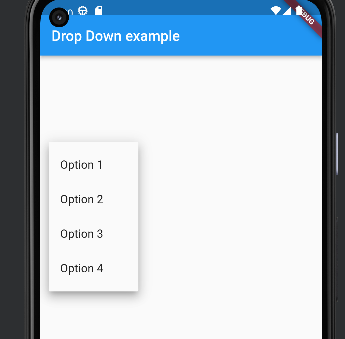
Creating a Dropdown in Flutter:
To create a dropdown in Flutter, you can use the DropdownButton widget. The DropdownButton widget requires a List<DropdownMenuItem> as its child, which defines the items that will appear in the dropdown.
Here’s an example of how to create a basic dropdown in Flutter:
String dropdownValue = 'Option 1';

DropdownButton<String>(
  value: dropdownValue,
  onChanged: (String newValue) {
    setState(() {
      dropdownValue = newValue;
    });
  },
  items: <String>['Option 1', 'Option 2', 'Option 3', 'Option 4']
      .map<DropdownMenuItem<String>>((String value) {
    return DropdownMenuItem<String>(
      value: value,
      child: Text(value),
    );
  }).toList(),
)
In the above code, dropdown Value is the currently selected value in the dropdown. The onChanged callback function updates the value of dropdown Value when the user selects a new option.
The items property is a list of the available options in the dropdown. Each option is defined as a Dropdown Menu Item widget, which has a value property and a child property. The value property represents the value of the option, and the child property is the widget that will be displayed as the option in the dropdown menu.
Custom the Dropdown:
You can customize the appearance of the dropdown by setting properties such as hint, icon, style, and elevation. Here’s an example of how to customize a dropdown in Flutter:
String dropdownValue = 'Option 1';

DropdownButton<String>(
  value: dropdownValue,
  icon: Icon(Icons.arrow_drop_down),
  iconSize: 24,
  elevation: 16,
  style: TextStyle(color: Colors.black),
  underline: Container(
    height: 2,
    color: Colors.blueAccent,
  ),
  onChanged: (String newValue) {
    setState(() {
      dropdownValue = newValue;
    });
  },
  items: <String>['Option 1', 'Option 2', 'Option 3', 'Option 4']
      .map<DropdownMenuItem<String>>((String value) {
    return DropdownMenuItem<String>(
      value: value,
      child: Text(value),
    );
  }).toList(),
)
In the above code, we’ve added an icon to the dropdown using the icon property. We’ve also changed the icon Size and elevation properties to adjust the appearance of the dropdown.
We’ve set the style property to change the text color of the options in the dropdown. We’ve also added an underline to the dropdown using the underline property.
Handling Dropdown Changes:
To handle changes to the selected option in the dropdown, you can define a callback function and pass it to the on Changed property of the Dropdown Button widget. The callback function should update the state of the widget with the new selected value.
Here’s an example of how to handle changes to the selected option in the dropdown:
String dropdownValue = 'Option 1';

void _handleDropdownChange(String newValue) {
  setState(() {
    dropdownValue = newValue;
  });
}

DropdownButton<String>(
  value: dropdownValue,
  onChanged: _handleDropdownChange,
  items: <String>['Option 1', 'Option 2', 'Option 3',
How to implement DropDown using Provider?
class MyProvider extends ChangeNotifier {
  String _selectedValue;

  String get selectedValue => _selectedValue;

  set selectedValue(String value) {
    _selectedValue = value;
    notifyListeners();
  }
}

class MyScreen extends StatelessWidget {
  @override
  Widget build(BuildContext context) {
    final myProvider = Provider.of<MyProvider>(context);

    return Scaffold(
      body: DropdownButton<String>(
        value: myProvider.selectedValue,
        onChanged: (newValue) {
          myProvider.selectedValue = newValue;
        },
        items: <String>['Option 1', 'Option 2', 'Option 3']
            .map<DropdownMenuItem<String>>((String value) {
          return DropdownMenuItem<String>(
            value: value,
            child: Text(value),
          );
        }).toList(),
      ),
    );
  }
}
How to implement DropDown using Getx?
class MyController extends GetxController {
  var selectedValue = 'Option 1'.obs;

  void onSelectedValueChanged(String value) {
    selectedValue.value = value;
  }
}

class MyScreen extends StatelessWidget {
  @override
  Widget build(BuildContext context) {
    final myController = Get.put(MyController());

    return Scaffold(
      body: DropdownButton<String>(
        value: myController.selectedValue.value,
        onChanged: (newValue) {
          myController.onSelectedValueChanged(newValue);
        },
        items: <String>['Option 1', 'Option 2', 'Option 3']
            .map<DropdownMenuItem<String>>((String value) {
          return DropdownMenuItem<String>(
            value: value,
            child: Text(value),
          );
        }).toList(),
      ),
    );
  }
}
How to implement Dropdown using BLoC?
class MyBloc {
  final _selectedValueController = BehaviorSubject<String>.seeded('Option 1');

  Stream<String> get selectedValueStream => _selectedValueController.stream;

  String get selectedValue => _selectedValueController.value;

  void dispose() {
    _selectedValueController.close();
  }

  void onSelectedValueChanged(String value) {
    _selectedValueController.sink.add(value);
  }
}

class MyScreen extends StatelessWidget {
  final MyBloc myBloc = MyBloc();

  @override
  Widget build(BuildContext context) {
    return Scaffold(
      body: StreamBuilder<String>(
        stream: myBloc.selectedValueStream,
        builder: (context, snapshot) {
          return DropdownButton<String>(
            value: snapshot.data ?? 'Option 1',
            onChanged: (newValue) {
              myBloc.onSelectedValueChanged(newValue);
            },
            items: <String>['Option 1', 'Option 2', 'Option 3']
                .
How to implement Dropdown using SetState ?
class MyScreen extends StatefulWidget {
  @override
  _MyScreenState createState() => _MyScreenState();
}

class _MyScreenState extends State<MyScreen> {
  String _selectedValue = 'Option 1';

  void onSelectedValueChanged(String value) {
    setState(() {
      _selectedValue = value;
    });
  }

  @override
  Widget build(BuildContext context) {
    return Scaffold(
      body: DropdownButton<String>(
        value: _selectedValue,
        onChanged: (newValue) {
          onSelectedValueChanged(newValue);
        },
        items: <String>['Option 1', 'Option 2', 'Option 3']
            .map<DropdownMenuItem<String>>((String value) {
          return DropdownMenuItem<String>(
            value: value,
            child: Text(value),
          );
        }).toList(),
      ),
    );
  }
}